Access Controls
You can restrict access for an environment, to a role or a set of users. Once an environment is created, you can further customize the access control privileges for that environment, without impacting other environments.
Update Policy
The Environment Update Policy allows you to manage how changes in the Application definition are handled. You can choose to be notified of changes, or you can allow changes to be automatically applied to the applications in the environment.
Resource Quota & Limit Range Overview
In Kubernetes, Resource Quotas provide constraints that limit aggregate resource consumption per namespace. It can limit the quantity of objects that can be created in a namespace by type, as well as the total amount of resources that may be consumed by resources in that namespace.
If a resource quota is configured, then it is required that every incoming pod/container makes an explicit request for the required resources. If a resource request is not configured, the pod creation request is rejected. A Limit Range can be used to force defaults for pods that don’t specify resource requirements.
Support of Resource Quota and Limit Range within Nirmata allows users to allocate the resources of a cluster to specific teams or applications.
Resource Quota and Limit Range enable cluster resources, including CPU, memory, PVCs, and a variety of other quantities, to be divided between multiple teams or applications.
Nirmata checks the quantities used at the specified level. If the quantity is found to be above the specified threshold for more than three minutes, an alarm is raised in Nirmata.
Resource Quotas can be set when the environment is created by selecting a specific Environment Type. The Resource Quotas defined in the Environment Type are copied into the Namespace associated with the environment. Only Admin users, Platform users and DevOps users with Environment Create permission can create an environment.
Resource Quotas and Limit Ranges can be added or modified even after the environment has been created. Only Admin users and Platform users can perform this operation.
Limit Ranges can be added and modified after the environment has been created. Only Admin users and Platform users and DevOps users with admin access can perform this operation.
Admin or platform users can specify the Default Resource Quota for an environment. This will be applied to any application/namespace that does not specify one.
-
Admin or platform users can define a Default Limit Range for an environment. It will be applied to any application that does not specifying one.
-
Admin or platform users can define an Environment Resource Quota.
-
An Alarm will be generated when the Resource Usage aggregated across all Applications exceeds the Environment Resource Quota
-
Admin or platform users can create/import/export/update/delete Resource Quotas and Limit Ranges in Environment configured with an “environment” level isolation.
-
Admin or platform users can create/import/update/view usage/delete Resource Quotas and Limit Ranges for applications deployed in Environments configured with an “application” level isolation.
-
All users can view the Resource usage for all the running applications in a given environment
-
All users will can view pod scheduling failure events related to Resource Quota and Limit Ranges
How to Create an Environment with Resource Quotas
In the navigation panel, select the Environment Types option. You will see default Environments Types. These pre-created Environment Types already specify memory Quotas. If you find an Environment Type that suits your needs then proceed to create the environment.
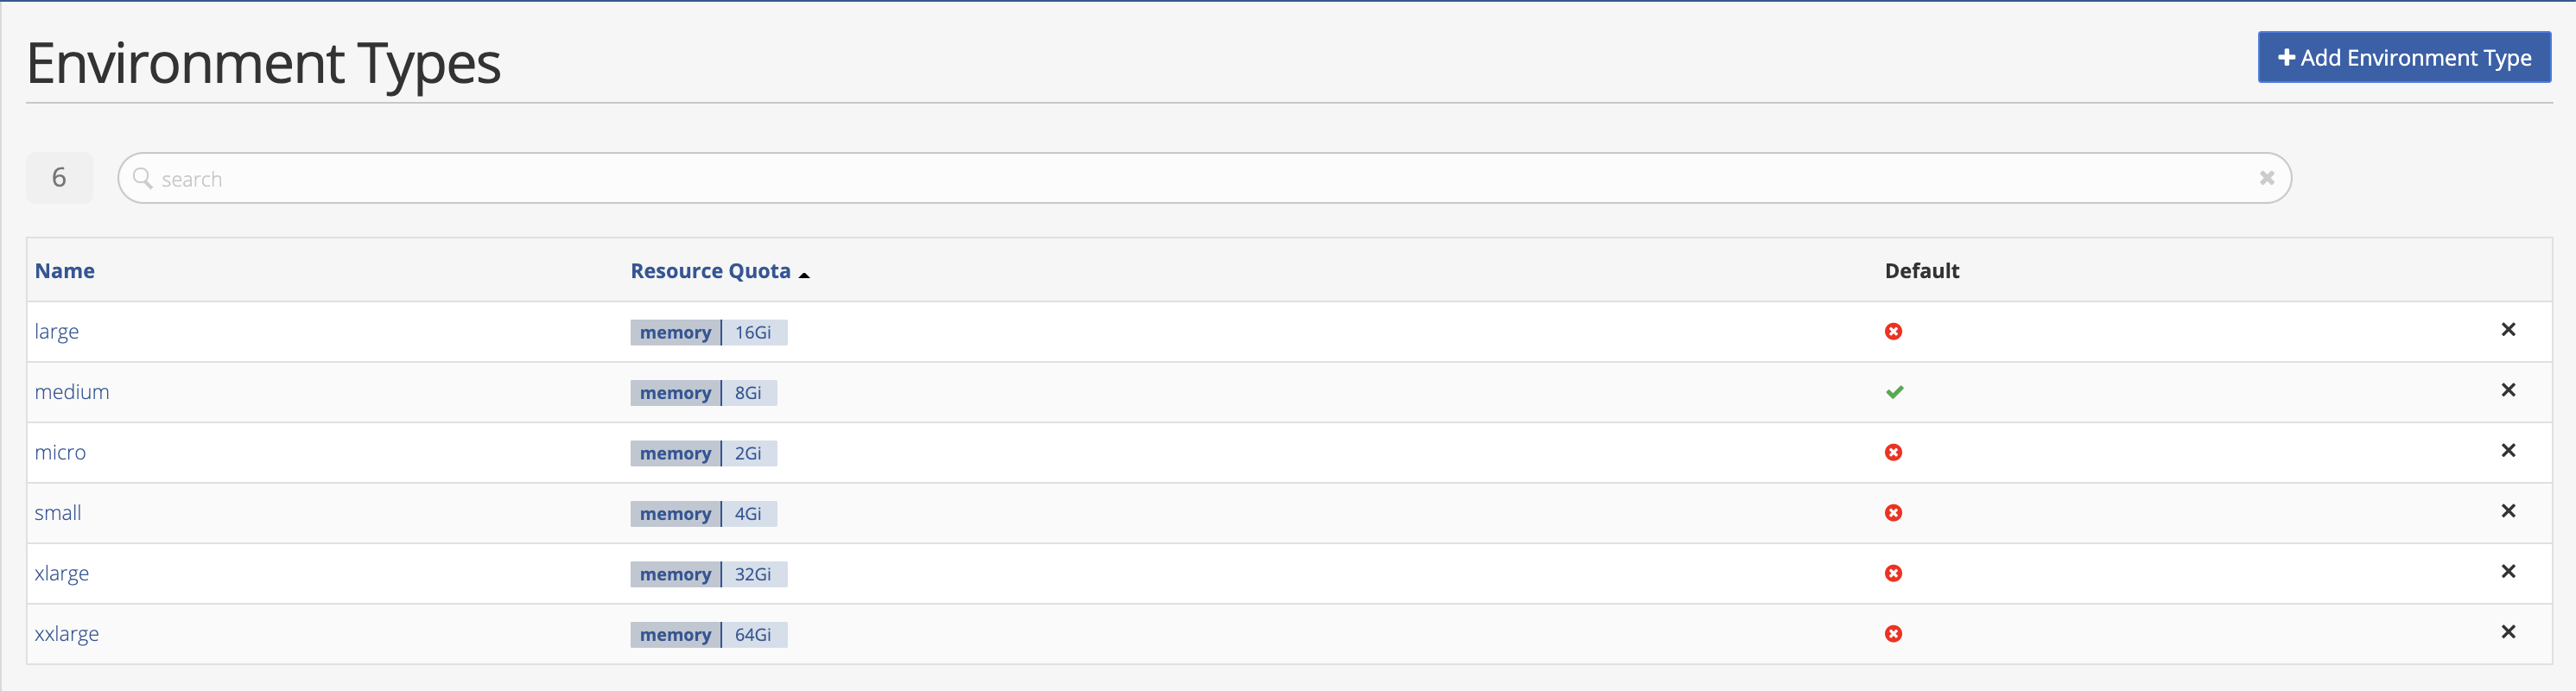
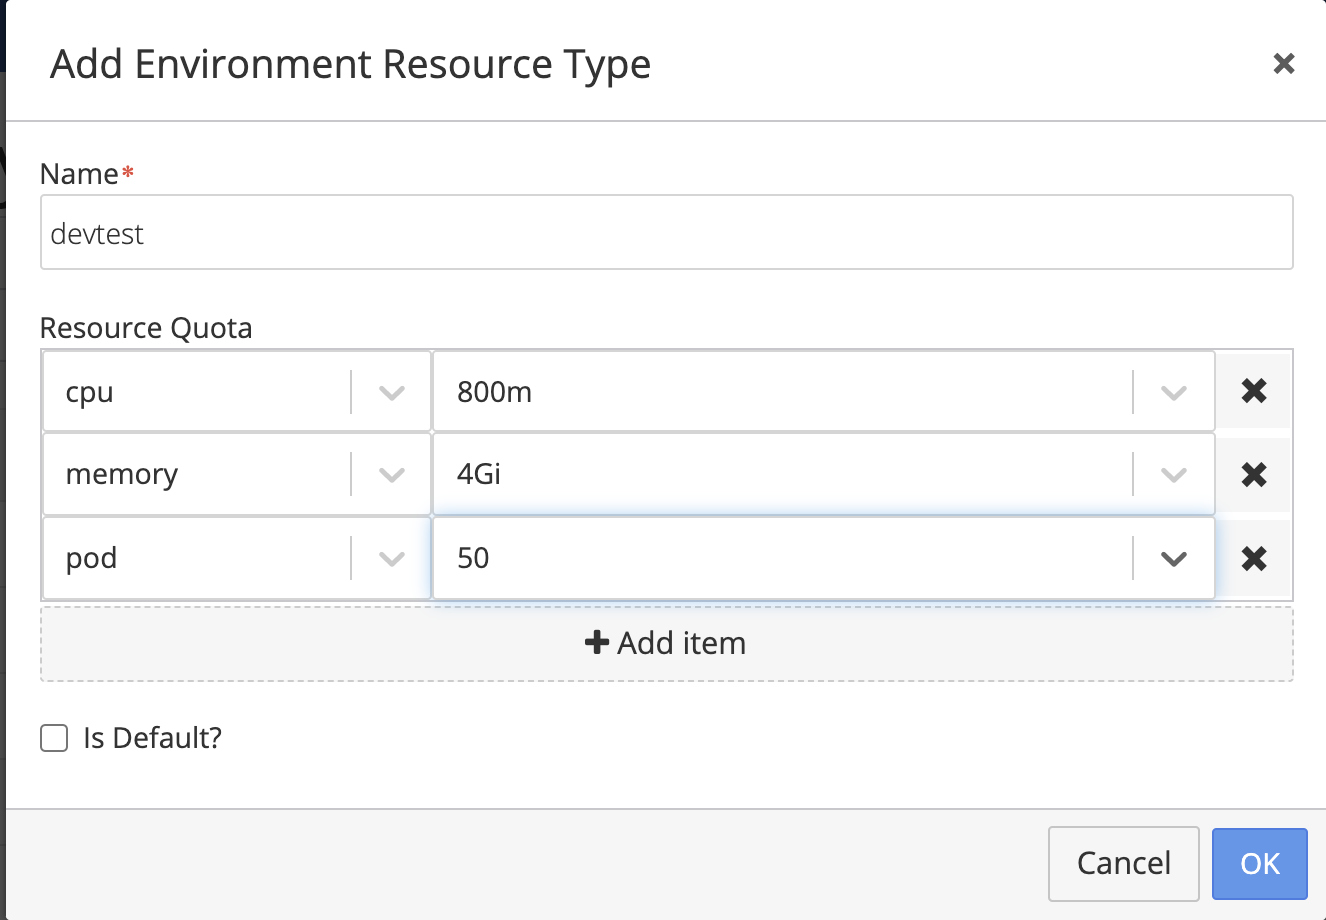
Otherwise, you can either edit an existing Environment Type or create a new one. In this example we create a new Environment Type name “devtest” and specify Resource Quotas for memory, CPU and the maximum number of pods.
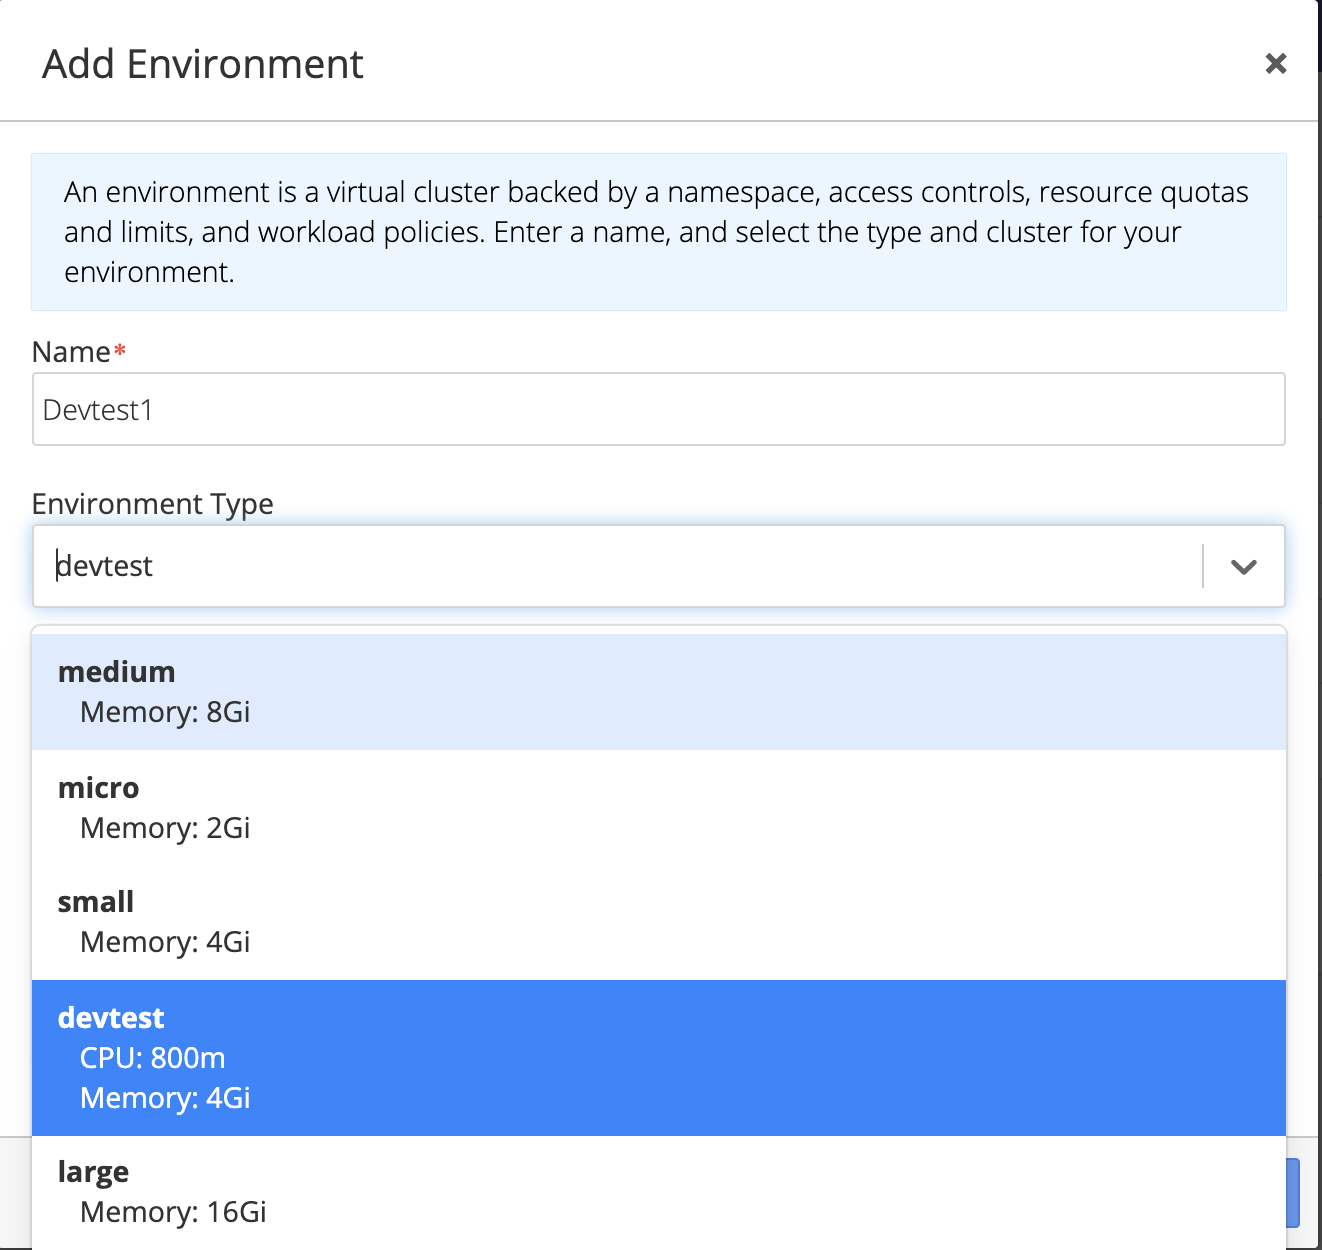
Once you have created or identified the Environment Type you want to use, select the Environment section in the navigation menu. Then click on Add Environment. At this point you can select the Environment Type of your choice.
Admin and Platform users have access to all Environment Types. DevOps users must have Create Environment access to the cluster to be able to create environment. In addition to this, DevOps users must have been granted explicit view access to the Environment Type to be able to select it in this menu.
How Modify Resource Quotas in an Existing Environment
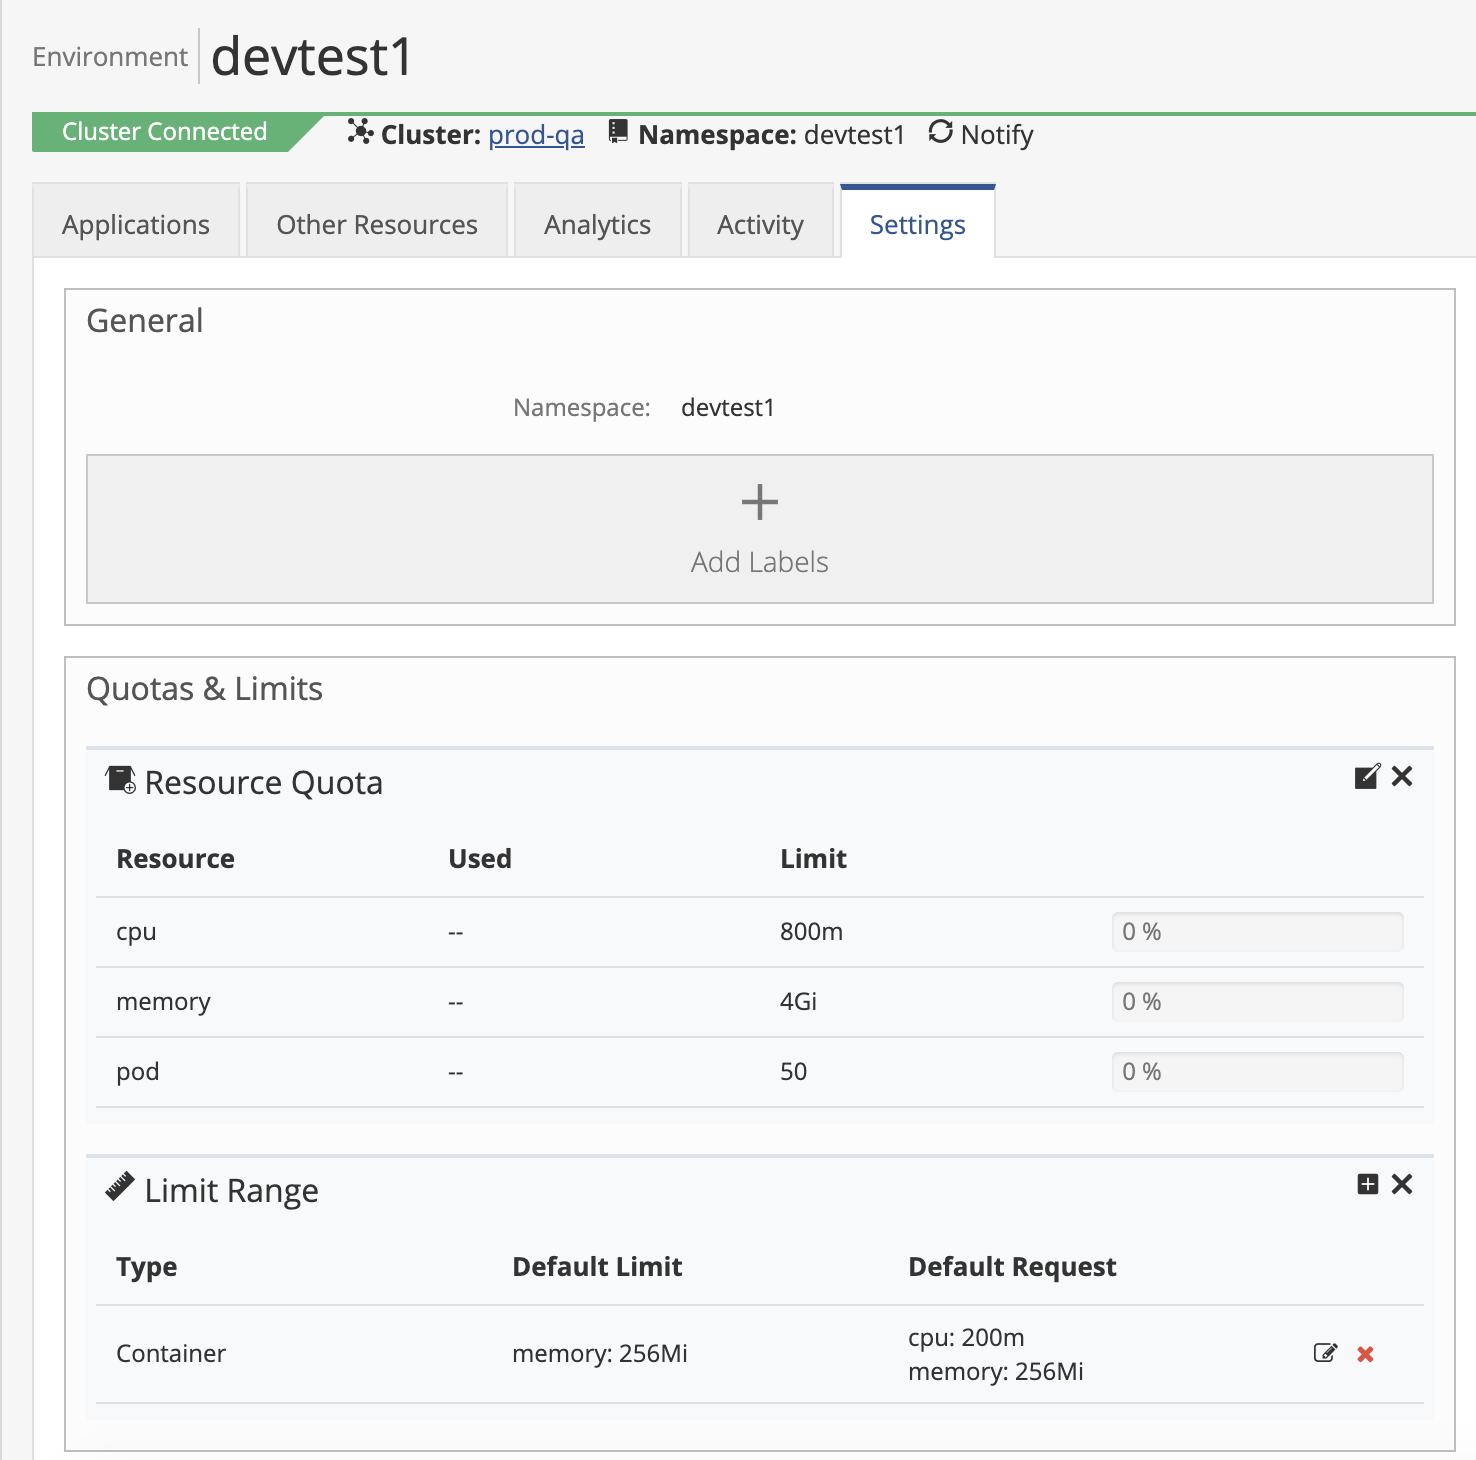
Admin and Platform users can add Resource Quotas to an existing environments. Select your environment and click on the Settings tab. In the Resource Quotas section you can either modify existing values or add new ones.

How to Set a Limit Range
Limit Range can be added to most Kubernetes resources but most often it is added to CPU, Memory, Container, Pod and PersistentVolumeClaim. Default values are required in the limit range for environments that use resource quotas so that any container that does not specify resource requests/limits can use the defaults.
Once you have created an environment with Resource Quotas, Nirmata will automatically define Limit Ranges. You can choose to keep these default values or to modify them. To edit the Limit Ranges, select your environment and then click on the Settings tab. You will find a section for Limit Range where you can modify existing values or enter new ones.
Click on the edit or add icons to modify the Limit Ranges
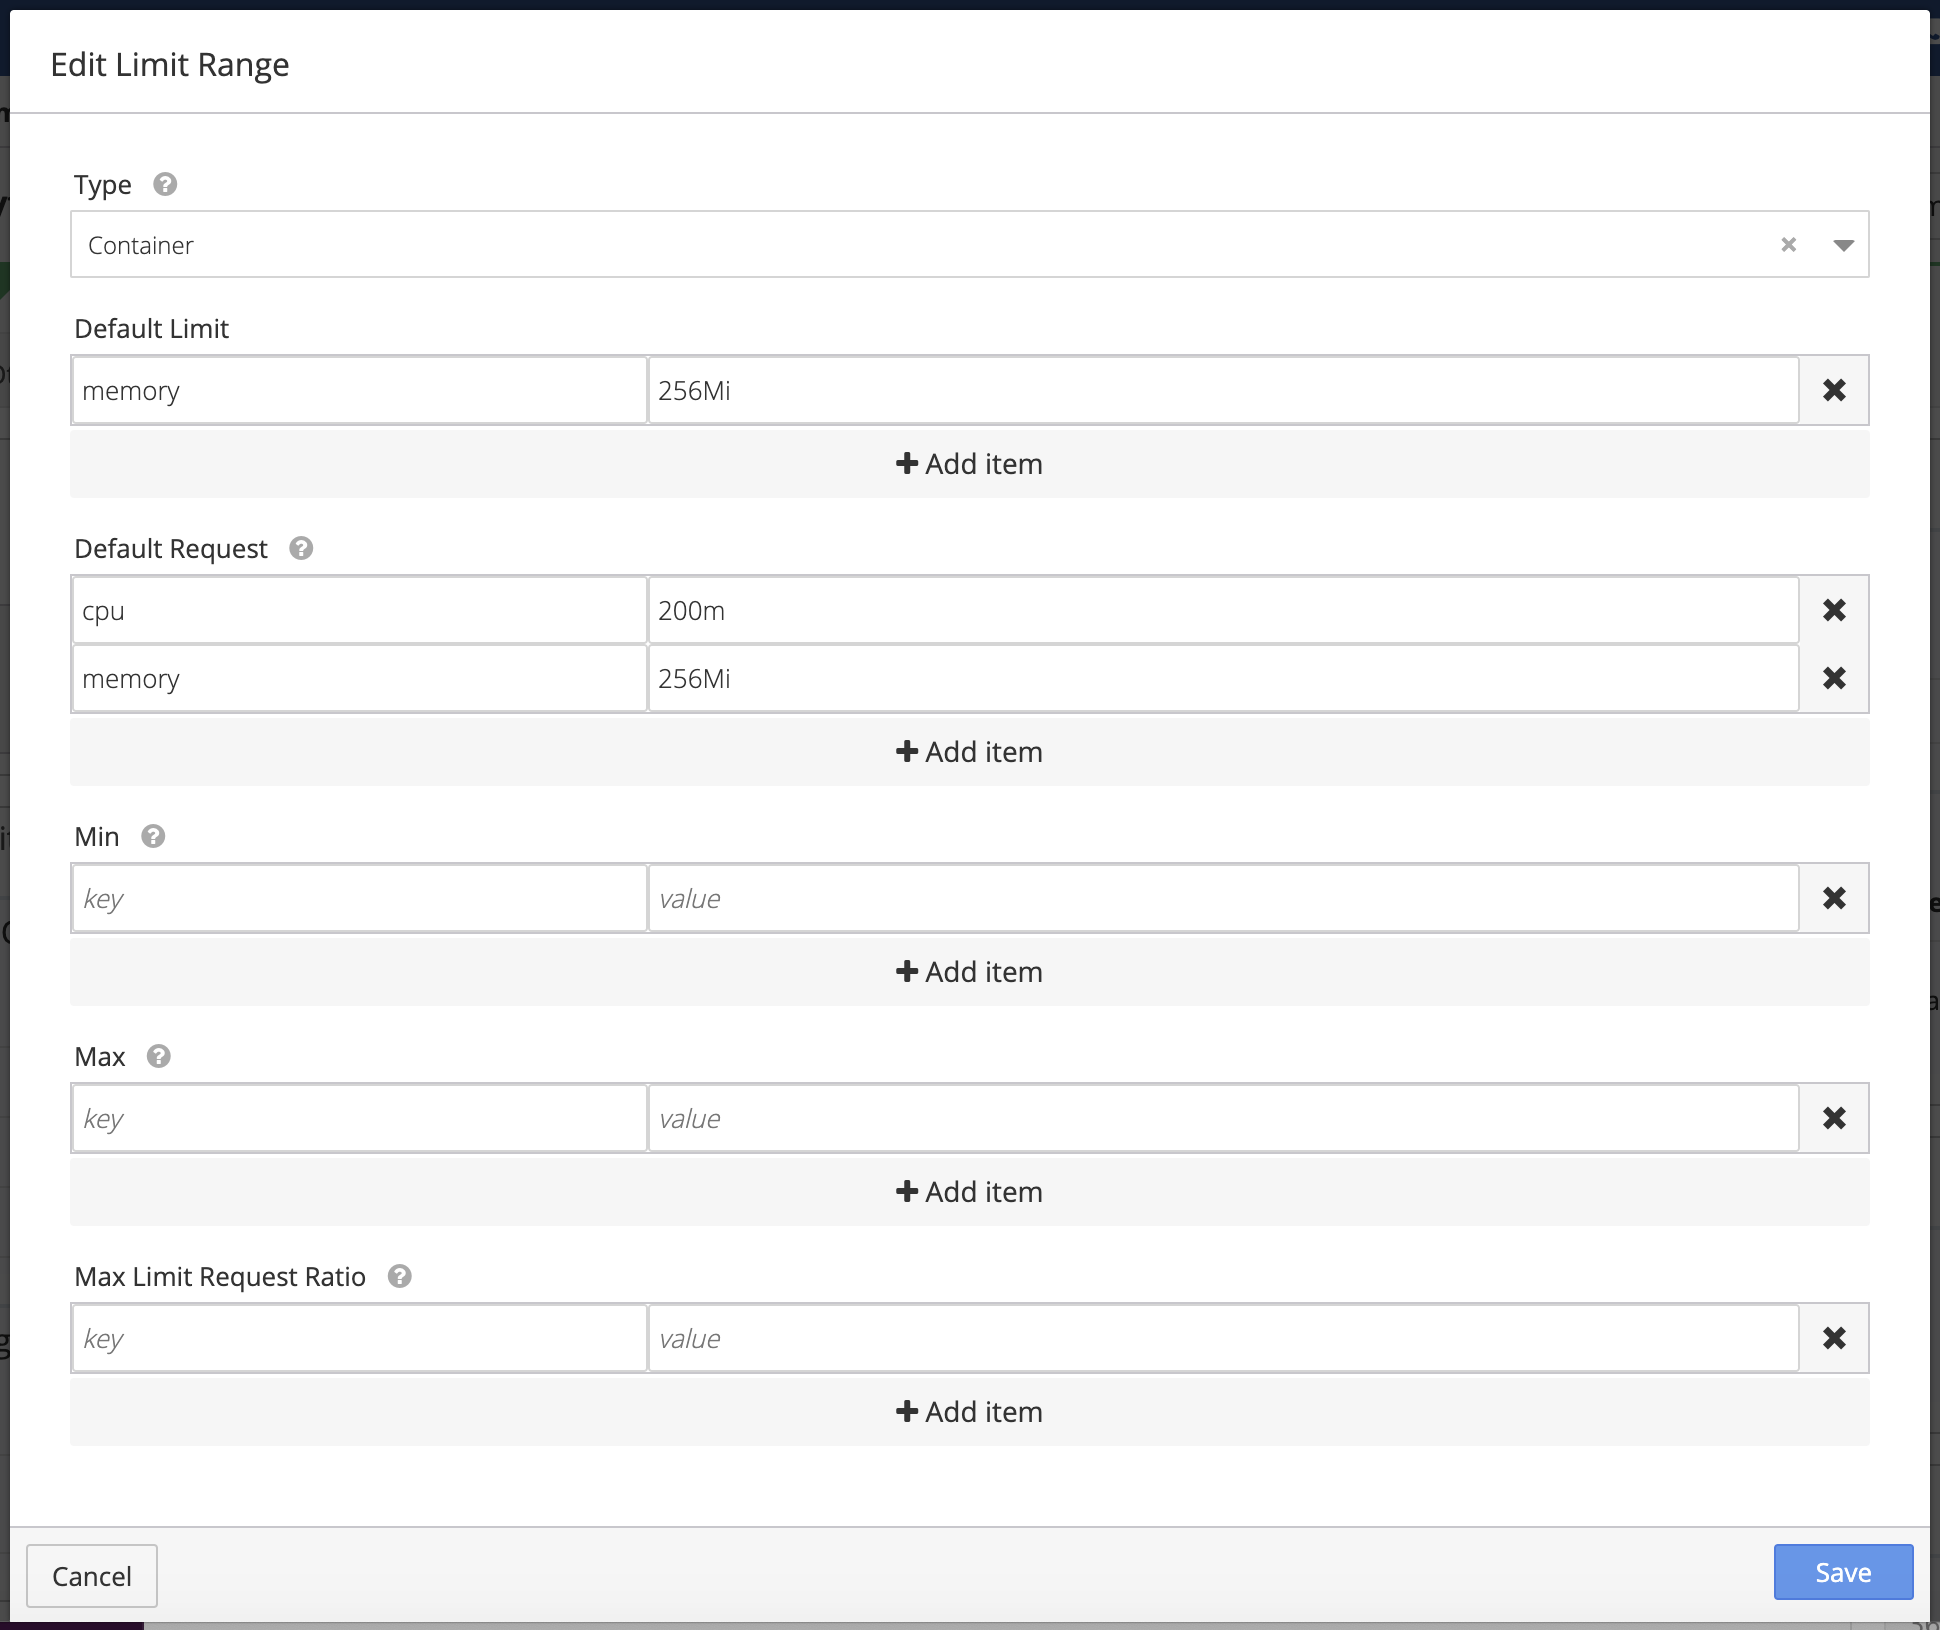
Specify the appropriate Default Limits to be applied at the container level. Each Default Level is the quantity that the container is guaranteed to have at start-up.
Default Request values are the quantities applied to containers that do not specify a request quantity. A Default Request is the minimum value for the specified resource and is applied to containers deployed in the environment.
Understanding Resource Quota Errors
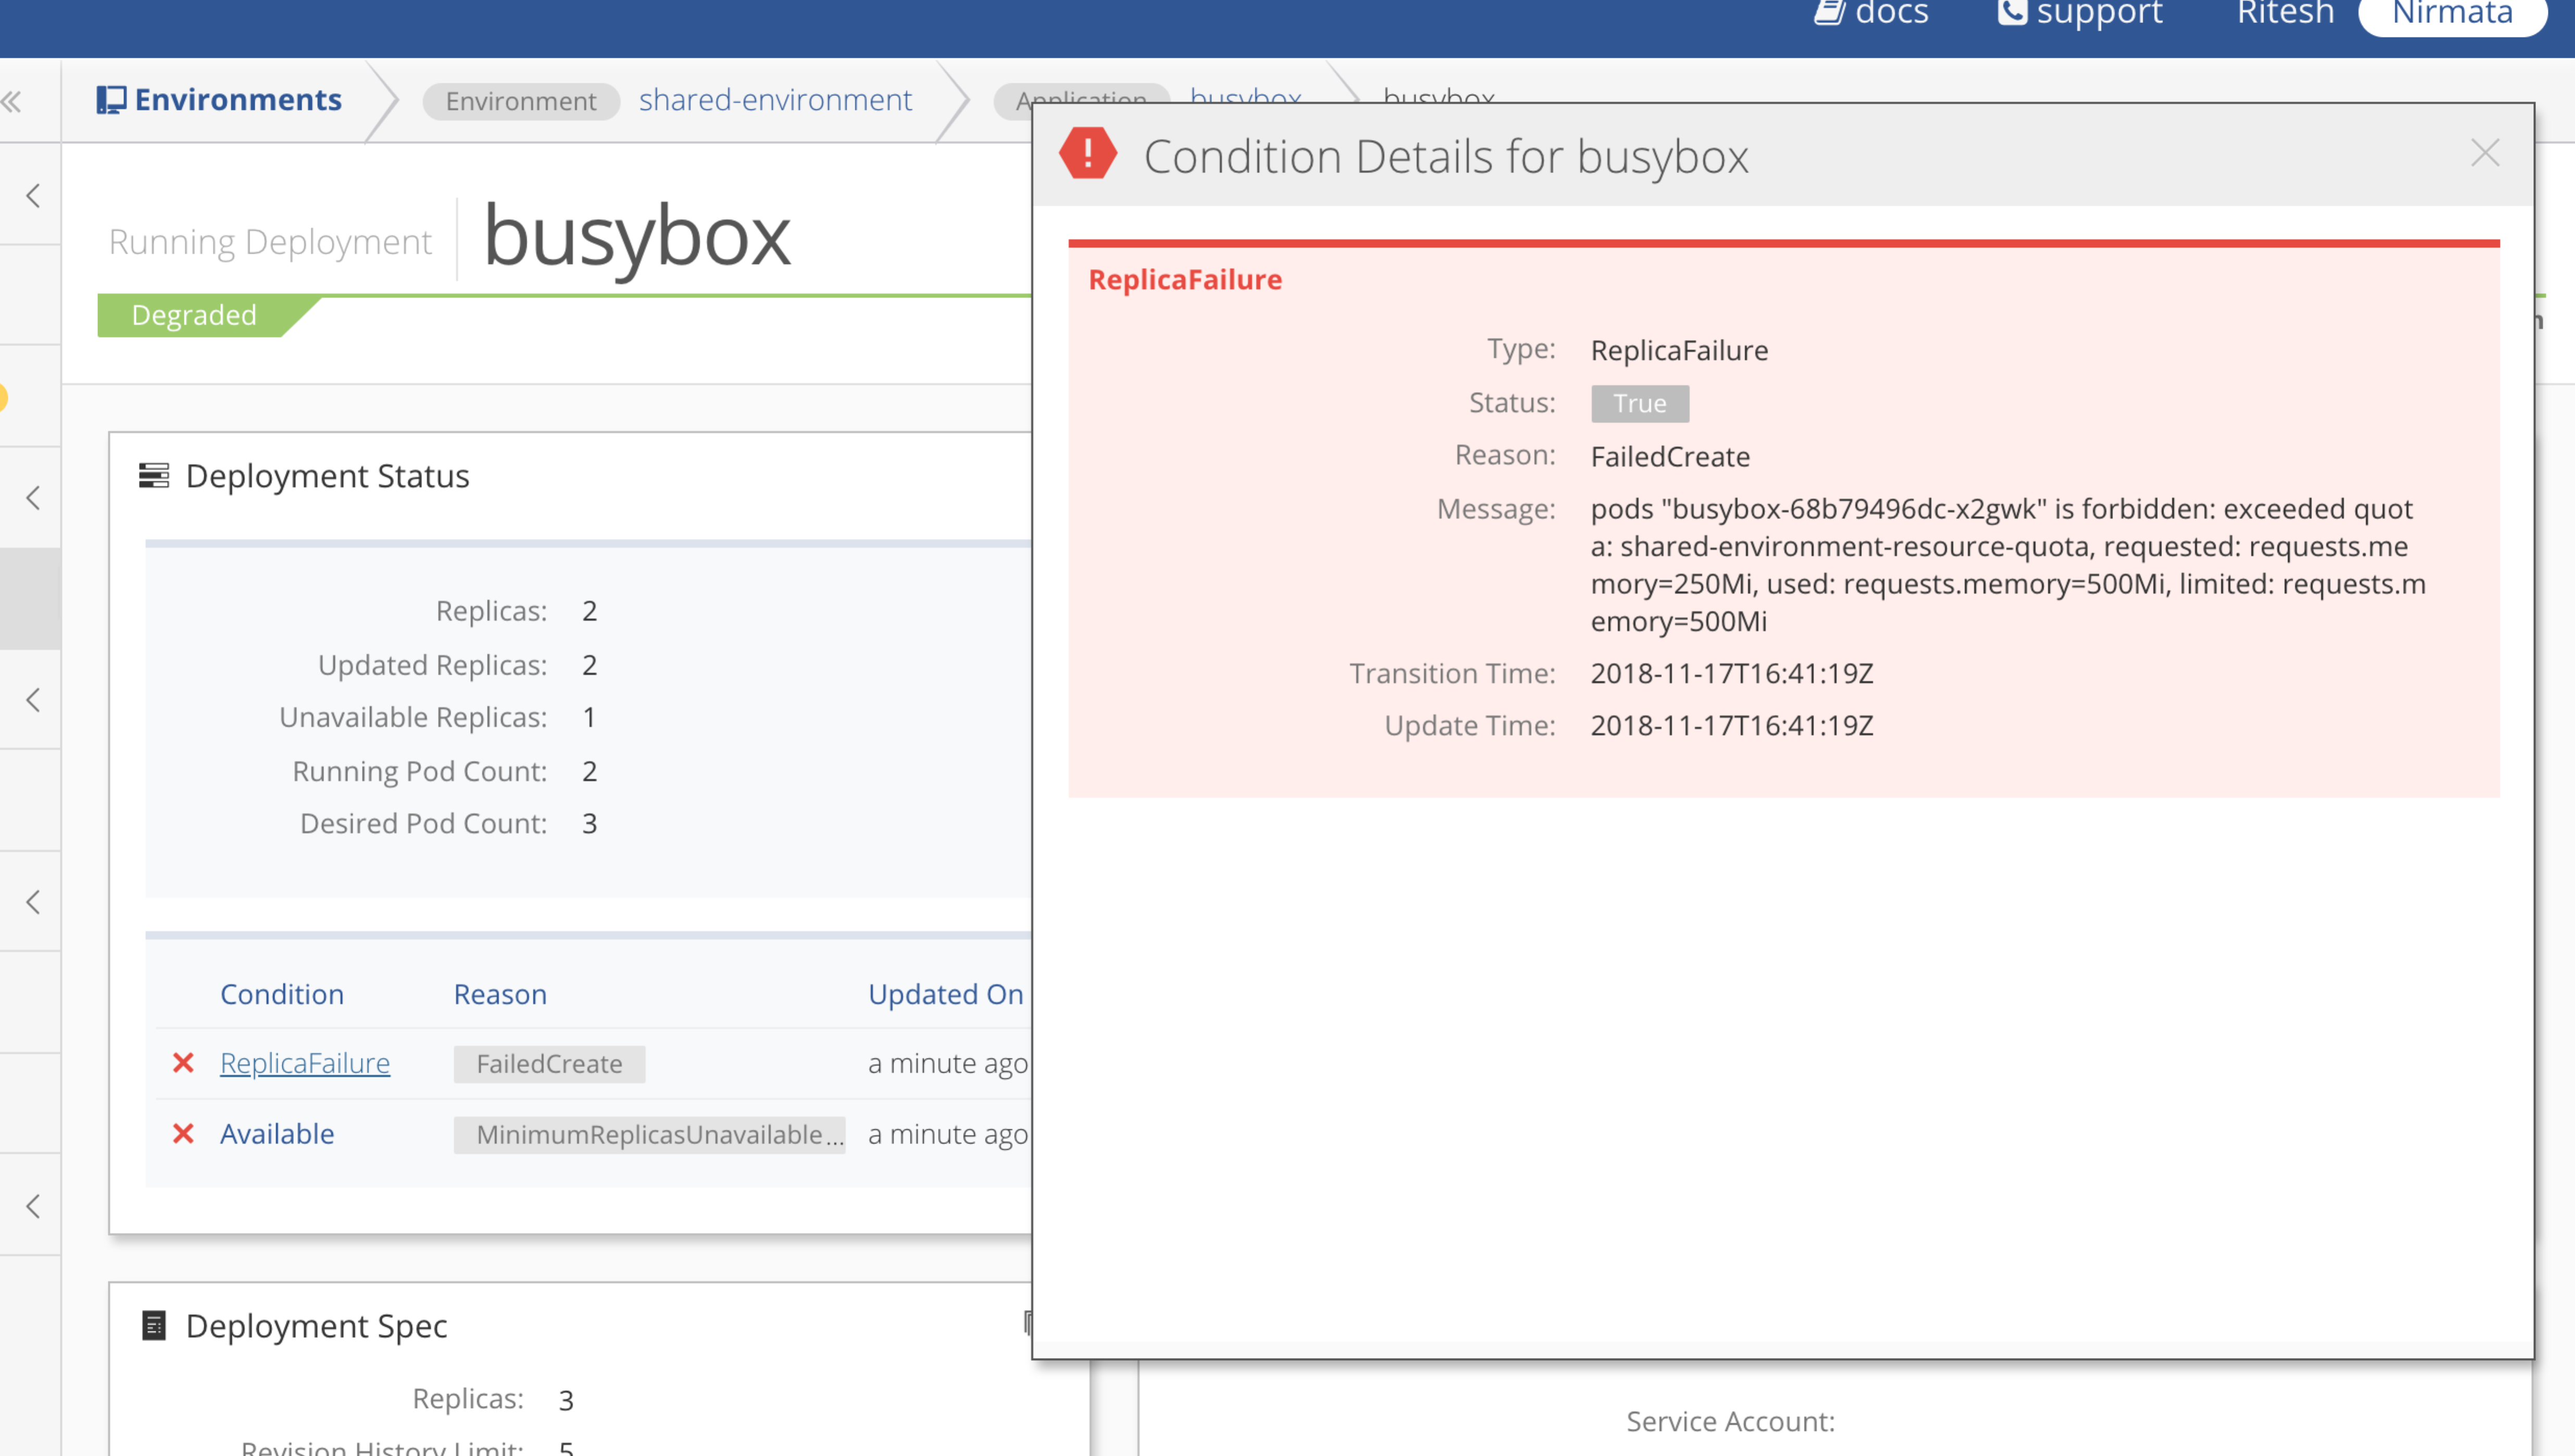
If the pod deployment fails when the resource quota is exceeded, the error details are displayed in Status.
For example, in a deployment, ReplicaFailure will display. View the details by clicking on the condition.
Monitoring Resource Usage
When users start deploying applications, one can visualize the resource usage for a specific environment. Select your environment and then click on the Settings tab. Users can see the percentage of resources consumed in the Resource Quotas panel.

Understanding Resource Quota Alarms
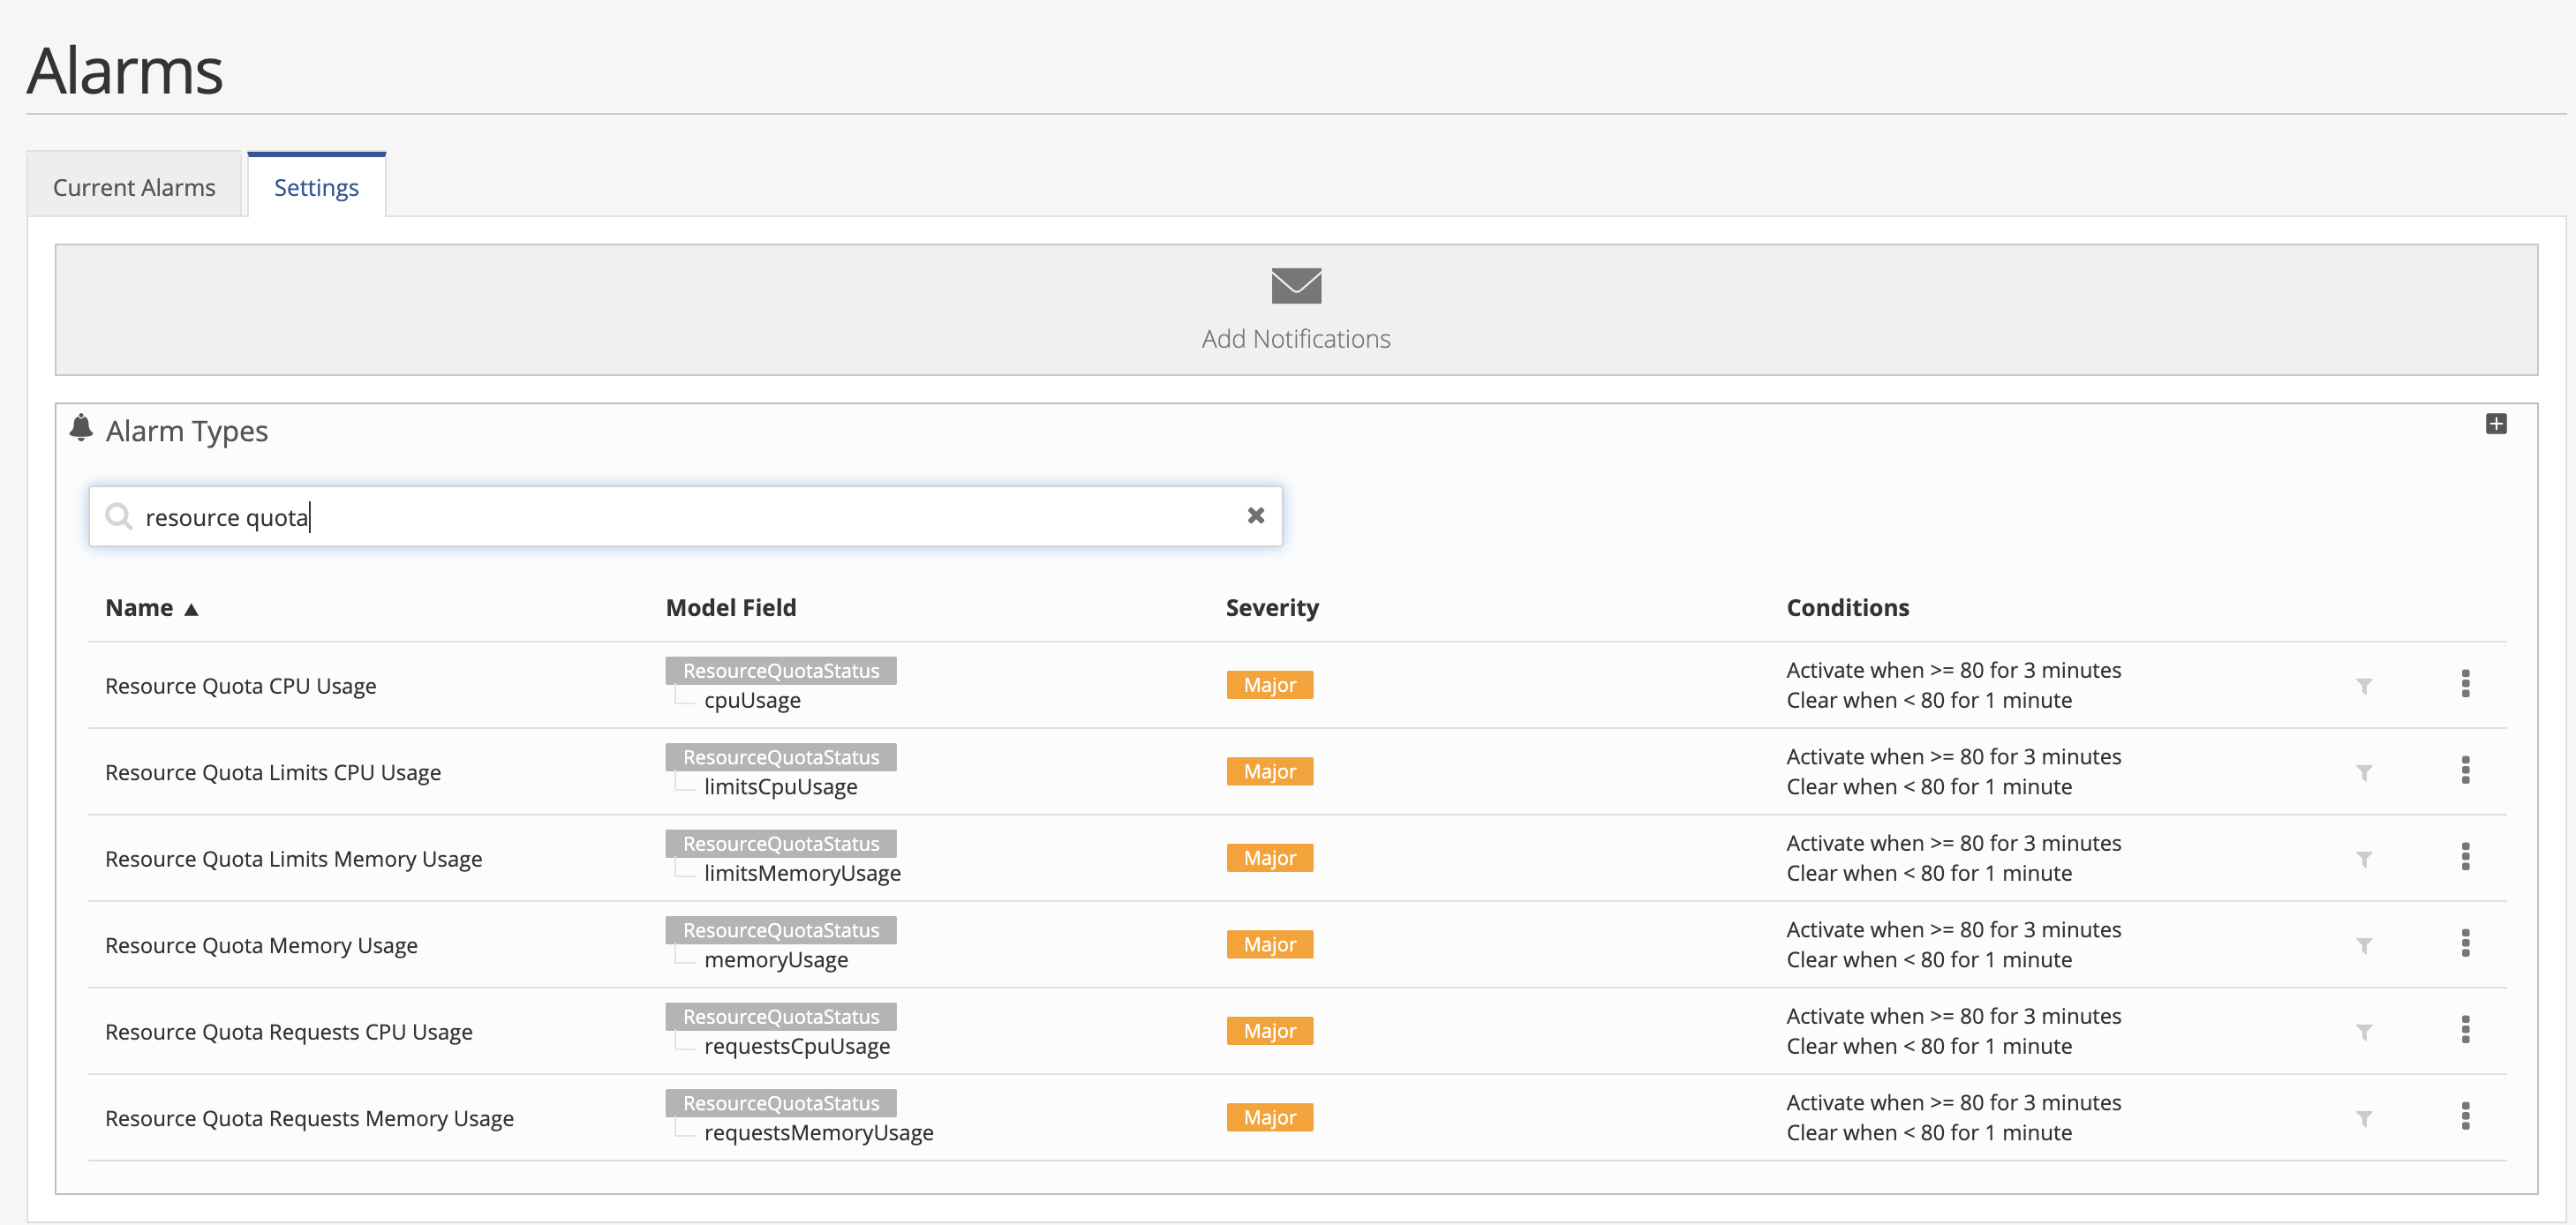
Nirmata generates the following alarms when resource quotas exceed the configured thresholds:
-
Resource Quota CPU Usage: This alarm is triggered when the allocated CPU request is greater than the threshold.
-
Resource Quota Limits CPU Usage: This alarm is triggered when the allocated CPU limit is greater than the threshold.
-
Resource Quota Limits Memory Usage: This alarm is triggered when the allocated memory limit is greater than the threshold.
-
Resource Quota Memory Usage: This alarm is triggered when the allocated memory request is greater than the threshold.
Admin and Platform users can modify these alarm definitions if required. Select the Alarm section in the navigation menu and then click on the Settings tab. Enter “resource quotas” in the search box to view all the Resource Quotas alarms.
Compute Resource Quotas
| Compute Resource Quotas | |
|---|---|
| cpu | Across all pods in a non-terminal state, the sum of CPU requests cannot exceed this value. |
| limits.cpu | Across all pods in a non-terminal state, the sum of CPU limits cannot exceed this value. |
| limits.memory | Across all pods in a non-terminal state, the sum of memory limits cannot exceed this value. |
| memory | Across all pods in a non-terminal state, the sum of memory requests cannot exceed this value. |
| requests.cpu | Across all pods in a non-terminal state, the sum of CPU requests cannot exceed this value. |
| requests.memory | Across all pods in a non-terminal state, the sum of memory requests cannot exceed this value. |
| amd.com/gpu | Across all pods in a non-terminal state, the sum of CPU limits cannot exceed this value. |
| nvidia.com/gpu | Across all pods in a non-terminal state, the sum of CPU limits cannot exceed this value. |
Storage Resource Quotas
| Storage Resource Quotas | |
|---|---|
| requests.storage | Across all persistent volume claims, the sum of storage requests cannot exceed this value. |
| persistentvolumeclaims | The total number of persistent volume claims that can exist in the namespace. |
| Across all persistent volume claims associated with the storage-class-name, the sum of storage requests cannot exceed this value. | |
| Across all pods in a non-terminal state, the sum of memory requests cannot exceed this value. |
Object Count Quota
Resource Quota can be added for any namespaced resource using the syntax:
count/<resource>.<group>
Following resources are supported:
| Supported Resources | |
|---|---|
| configmaps | The total number of config maps that can exist in the namespace. |
| pods | The total number of pods in a non-terminal state that can exist in the namespace. A pod is in a terminal state if is in Failed, Succeeded phase. |
| persistentvolumeclaims | The total number of persistent volume claims that can exist in the namespace. |
| replicationcontrollers | The total number of replication controllers that can exist in the namespace. |
| resourcequotas | The total number of resource quotas that can exist in a namespace. |
| services | The total number of services that can exist in the namespace. |
| services.loadbalancers | The total number of services of type load balancer that can exist in the namespace. |
| services.nodeports | The total number of services of type node port that can exist in the namespace. |
| secrets | The total number of secrets that can exist in the namespace. |