With a cross-account assume role, Nirmata creates and manages EKS clusters in an AWS account that you own (the target account) without storing access keys. Nirmata assumes an IAM role in the target account and uses short-lived credentials to create the EKS control plane, node groups, and related resources in that account.
This page walks you through preparing the target account, adding the cloud credential, and creating the EKS cluster.
How it works
| Account | Role in the flow |
|---|---|
| Nirmata account | The Nirmata service calls sts:AssumeRole on the cross-account role in the target account, passing the External ID. |
| Target account | Owns the cross-account role, the EKS cluster role, the node IAM role, the VPC, and the cluster. All resources are created and billed here. |
- You create a cross-account role in the target account that trusts Nirmata.
- You add the role ARN to Nirmata as an AWS cloud credential.
- When you create a cluster, Nirmata assumes the role, then creates the EKS cluster in the target account and passes the EKS cluster role and node IAM role to AWS.
Prerequisites in the target account
Complete the following in the target account before you create the cluster. All resources must be in the same region where you create the cluster.
1. Cross-account assume role
Create the IAM role that Nirmata assumes. Follow AWS Cross Account Assume Role to create the role with:
- A trust policy that allows the Nirmata principal with your External ID, and the
eks.amazonaws.comservice. - The AmazonEKSClusterPolicy managed policy.
- The Nirmata permission policy for EC2, EKS, IAM, and
iam:PassRole.
Note the role ARN, for example arn:aws:iam::<TARGET_ACCOUNT_ID>:role/AmazonEKSClusterRole.
2. EKS cluster role
EKS needs a service role to manage cluster resources on your behalf. You can either:
- Reuse the cross-account role (recommended). Because its trust policy includes
eks.amazonaws.comand it has AmazonEKSClusterPolicy attached, the same role works as the EKS cluster role. ThePassClusterRoleToEKSstatement already allows Nirmata to pass it to EKS. - Create a separate cluster role. Follow Amazon EKS Cluster Role
in the target account. Then make sure the
iam:PassRolestatements in the cross-account role’s permission policy include this role’s ARN.
3. Node IAM role
Create a node role in the target account for the worker nodes:
- In the target account, open IAM > Roles > Create role.
- Select AWS service > EC2, then click Next.
- Attach the following managed policies:
- AmazonEKSWorkerNodePolicy
- AmazonEKS_CNI_Policy
- AmazonEC2ContainerRegistryReadOnly
- Enter a role name, for example
NirmataEKSNodeRole, and click Create role.
Or, using the AWS CLI:
cat > node-trust-policy.json <<'EOF'
{
    "Version": "2012-10-17",
    "Statement": [
        {
            "Effect": "Allow",
            "Principal": { "Service": "ec2.amazonaws.com" },
            "Action": "sts:AssumeRole"
        }
    ]
}
EOF

aws iam create-role --role-name NirmataEKSNodeRole \
  --assume-role-policy-document file://node-trust-policy.json

for p in AmazonEKSWorkerNodePolicy AmazonEKS_CNI_Policy AmazonEC2ContainerRegistryReadOnly; do
  aws iam attach-role-policy --role-name NirmataEKSNodeRole \
    --policy-arn arn:aws:iam::aws:policy/$p
done
The PassNodeRoleToEC2AndEKS statement in the cross-account role allows Nirmata to pass any role in the target account to EC2 and EKS. To restrict it, replace role/* with this node role’s ARN.
4. Networking
Create the following in the target account:
- VPC with DNS hostnames and DNS resolution enabled.
- Subnets in at least two Availability Zones. If the nodes run in private subnets, they need a NAT gateway or VPC endpoints to reach the EKS API, Amazon ECR, and Nirmata.
- Security groups for the control plane and worker nodes. See the security group requirements in Amazon Elastic Kubernetes Service (EKS) .
NOTE:
The Nirmata controller in the cluster must be able to reach Nirmata over outbound HTTPS (port 443). Without it, the cluster stays in the Pending controller connect state and then fails.
5. (Optional) Envelope encryption key
If you plan to enable Envelope Encryption, create a symmetric KMS key in the target account. Then add the following statement to the cross-account role’s permission policy so that Nirmata can use the key:
{
    "Sid": "KMSForEnvelopeEncryption",
    "Effect": "Allow",
    "Action": [
        "kms:DescribeKey",
        "kms:CreateGrant"
    ],
    "Resource": "arn:aws:kms:<REGION>:<TARGET_ACCOUNT_ID>:key/<KEY_ID>"
}
6. (Optional) SSH key pair
To SSH into the worker nodes, create an EC2 key pair in the target account and region.
Step 1: Add the cloud credential for the target account
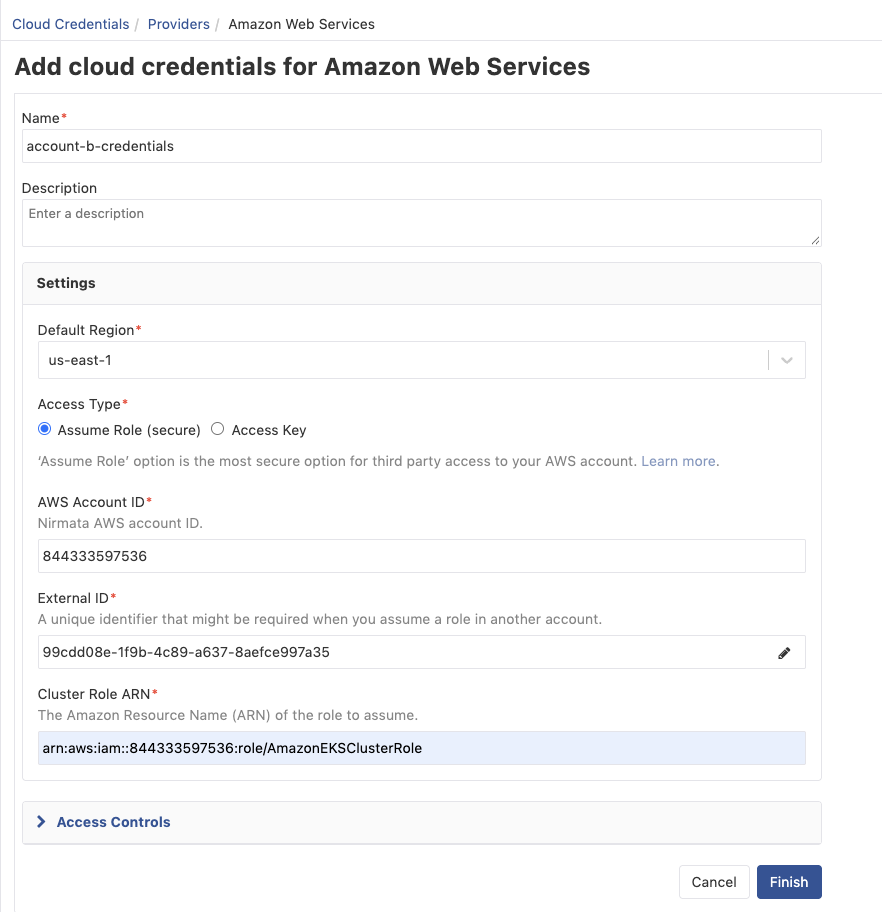
- In Nirmata, go to Cloud Credentials and click +Add Cloud Credentials.
- Enter a name that identifies the target account, for example
aws-prod-<TARGET_ACCOUNT_ID>, and select Amazon Web Services as the type. - Click Next.
- On the Settings tab, select the Default Region. Copy the External ID, and use it in the cross-account role’s trust policy if you have not already.
- Enter the cross-account role ARN in Cluster Role ARN.
- Click Next to go to the Validate tab, and then click Finish when validation shows Success.
NOTE:
The External ID changes each time you click +Add Cloud Credentials. If you closed the screen after creating the role, update the trust policy with the new External ID before you validate.
Step 2: Create an EKS cluster type for the target account
-
Select Clusters from the sidebar, click Cluster Types, then click Add Cluster Type.
-
Choose EKS.
-
Enter a Name (required) and an optional Description, and select the target account credential you created in Step 1 in Cloud Credentials.
-
In the Cluster section, configure the cluster settings. All the dropdowns are filled in from the target account, by using the assumed role. Required fields are marked with *.
Field Value for the cross-account setup Kubernetes Version * The Kubernetes version you need. Enable Auto-sync Namespaces Optional. Enabled by default. Cluster IAM Role ARN * The EKS cluster role from prerequisite 2 (the cross-account role, or a separate cluster role). The role must be in the target account, because EKS does not accept a cluster role from another account. Target Account Role ARN Optional. Use it only for a hub-and-spoke setup, where the credential role is in a hub account and Nirmata must assume a second role in the spoke (target) account. Leave it empty if the credential role is already in the target account. When you change this field, Nirmata clears and reloads the cluster role, node IAM roles, VPCs, SSH keys, launch templates, and KMS keys from the spoke account. Region * The region where you created the target account VPC and roles. The default is us-west-1.VPC * The target account VPC from prerequisite 4. Networks * At least two subnets in different Availability Zones. Security Groups The control-plane security group. Private Endpoint Access Enable only if Nirmata and your users can reach the private endpoint. Enable IAM Role for Service Accounts Optional. Enables an OIDC identity provider for the cluster (IRSA). Enable Envelope Encryption Optional. When enabled, the KMS Key field is required. Select the key from prerequisite 5. 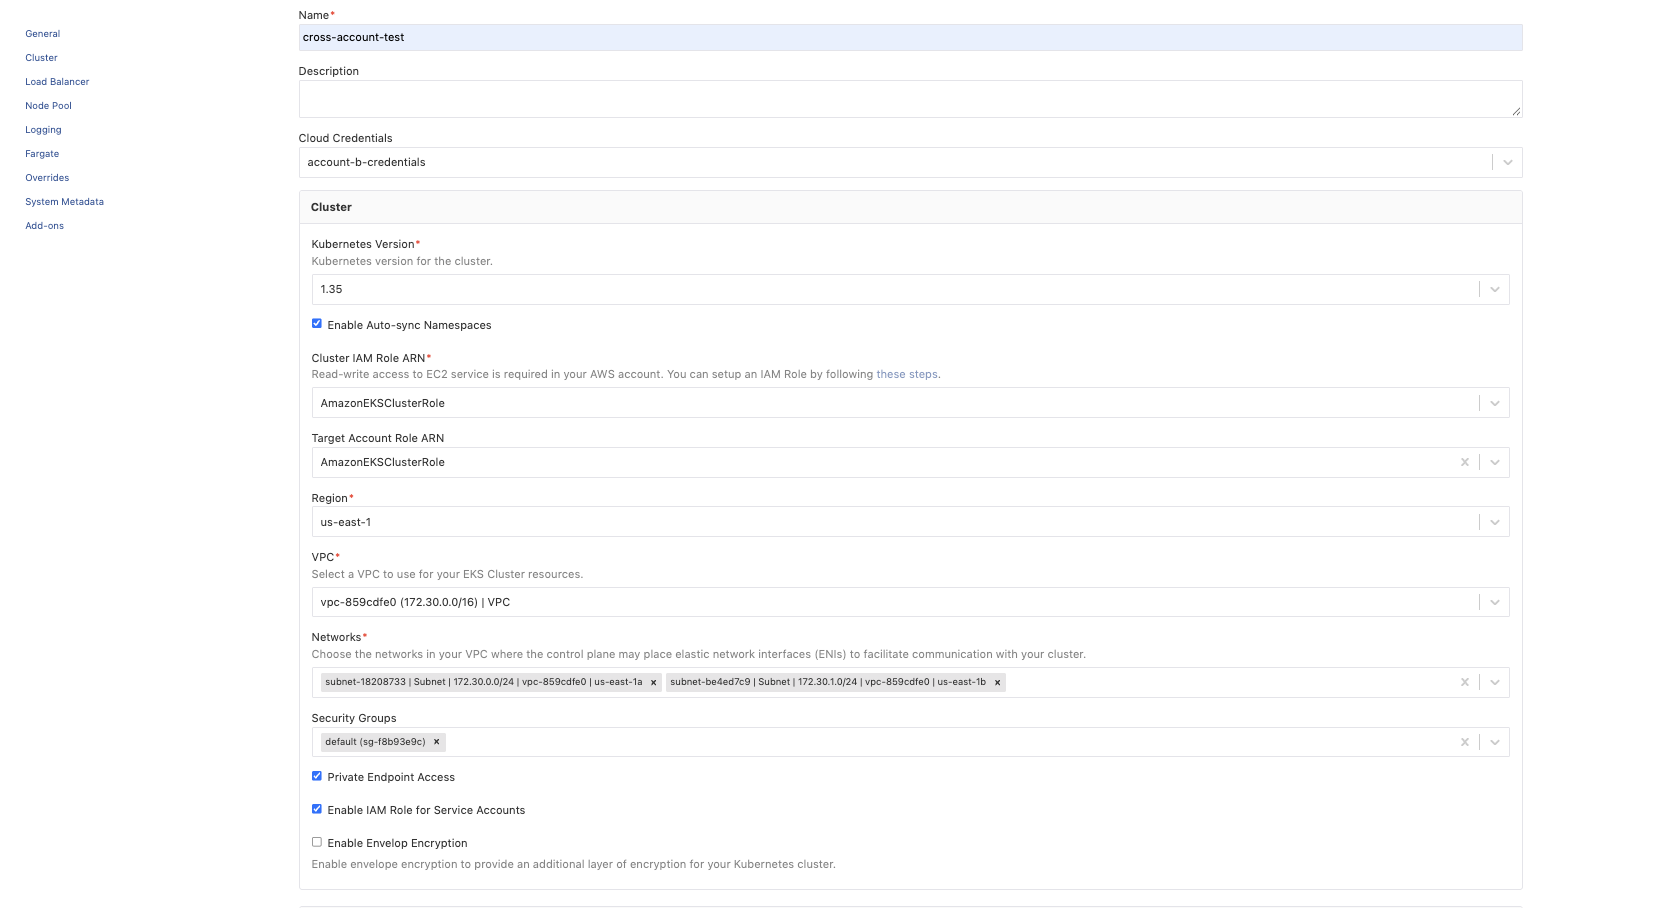
-
Optional: in the Load Balancer Configuration section, select Enable Load Balancer and choose a Policy ARN.
-
In the Node Pools section, configure at least one node pool. Each node pool needs a unique Name. Then select how to configure the node pool in How would you like to configure this node pool?:
- Configure Manually
- Using Launch Template
- Using CloudFormation Template
For Configure Manually, fill in the following fields:
Field Value for the cross-account setup Node IAM Role * The node role from prerequisite 3, for example NirmataEKSNodeRole.Capacity Type ON_DEMANDorSPOT.Node Security Group The worker node security group. Disk Size The node disk size, in GiB. The default is 100. SSH Key Optional. The key pair from prerequisite 6. Instance Type * The EC2 instance type for the worker nodes. Use Custom AMI Optional. When enabled, Image ID and User Data are required. AMI Type The Amazon Linux 2 or Amazon Linux 2023 AMI type for the nodes. Node Labels, Annotations, Taints Optional. For Using Launch Template, select the Launch Template Name and Launch Template Version from the target account, then fill in Node IAM Role *, Capacity Type, SSH Key, Instance Type *, and AMI Type. Nirmata hides SSH Key, Instance Type, and AMI Type if the launch template already defines the key pair, instance type, or image. Node Security Group, Disk Size, and the custom AMI fields come from the template.
For Using CloudFormation Template, select a Template Source (Amazon S3 URL or Upload a template file in YAML or JSON format). Nirmata reads the template and shows its parameters as node pool fields. The cross-account role needs the
CloudFormationNodePoolspermissions and permissions for the resources that the template creates. See Step 2 of AWS Cross Account Assume Role .NOTE:
Launch templates are specific to an account. If you change Cloud Credentials or Target Account Role ARN, select the launch template again. Nirmata switches any node pool that used a launch template back to Configure Manually until you do.
-
Configure the optional sections:
- Manage Logging: select the control plane logs to enable (API server, Audit, Authenticator, Controller manager, Scheduler).
- Fargate: select Enable Fargate, then enter the Pod Execution Role ARN, the Subnets (required), and the Namespace Label Selectors and Pod Label Selectors.
- Overrides: select the Cluster and Node Pool Fields that can be overridden when you create a cluster from this type, and whether to Allow Override Cloud Credentials.
- System Metadata: optional metadata for the cluster.
- Add-ons: the add-ons to deploy, in order, and the Kyverno Configuration to use.
For more information, see Amazon Elastic Kubernetes Service (EKS) .
-
Click Create.
Step 3: Create the cluster
- Select Clusters from the sidebar and click Add Cluster.
- Select EKS.
- Select the cluster type you created in Step 2.
- Enter the node count, or enable autoscaling for the node pool.
- Click Create cluster.
Nirmata assumes the cross-account role and creates the cluster in the target account. Cluster creation takes 10–15 minutes. The cluster is ready when its state is Ready in Nirmata.
Step 4: Verify the cluster in the target account
- Log in to the target account and open Amazon EKS > Clusters in the selected region. The new cluster is listed with status Active.
- Open the cluster and check:
- Overview > Cluster IAM role ARN shows the cluster role from prerequisite 2.
- Compute > Node groups shows the node group with the node role from prerequisite 3.
- In CloudTrail > Event history, filter by User name to see the API calls that Nirmata made through the assumed-role session.
Grant target account users access to the cluster
EKS gives cluster admin access only to the IAM principal that created the cluster, which is the cross-account role. To let other IAM users or roles in the target account run kubectl, add an access entry for them:
aws eks create-access-entry \
  --cluster-name <CLUSTER_NAME> \
  --principal-arn arn:aws:iam::<TARGET_ACCOUNT_ID>:role/<ADMIN_ROLE_NAME>

aws eks associate-access-policy \
  --cluster-name <CLUSTER_NAME> \
  --principal-arn arn:aws:iam::<TARGET_ACCOUNT_ID>:role/<ADMIN_ROLE_NAME> \
  --policy-arn arn:aws:eks::aws:cluster-access-policy/AmazonEKSClusterAdminPolicy \
  --access-scope type=cluster

# Configure kubectl to assume the role that was granted access
aws eks update-kubeconfig --name <CLUSTER_NAME> --region <REGION> \
  --role-arn arn:aws:iam::<TARGET_ACCOUNT_ID>:role/<ADMIN_ROLE_NAME>
The --role-arn option configures the kubeconfig to assume <ADMIN_ROLE_NAME> when it gets a token. Without it, kubectl uses your current AWS identity, which is not authorized unless it has its own access entry. The identity that runs kubectl must be allowed to assume <ADMIN_ROLE_NAME>.
You can also download the kubeconfig for the cluster from Nirmata.
Troubleshooting
| Symptom | Cause and resolution |
|---|---|
Cloud credential validation fails with AccessDenied on sts:AssumeRole |
The trust policy does not include the Nirmata principal, or the External ID does not match. Copy the current External ID from Nirmata into the trust policy. |
| VPC, subnet, or role dropdowns are empty in the cluster type | The wrong region is selected, or the role is missing the ec2:Describe* or iam:Get*/iam:List* permissions. |
Cluster creation fails with iam:PassRole access denied |
The cluster role or node role ARN is not covered by the iam:PassRole statements in the cross-account role. |
Cluster creation fails with Role is not authorized to perform eks:... |
The EKS cluster role does not trust eks.amazonaws.com, or AmazonEKSClusterPolicy is not attached. |
| Nodes do not join the cluster | The node role is missing one of the three managed policies, or the subnets have no route to the EKS API and Amazon ECR. |
CloudFormation node pool fails with AccessDenied |
The cross-account role is missing the CloudFormationNodePools statement, permissions for the resources in the template, or s3:GetObject on the template in Amazon S3. |
| Envelope encryption fails | The cross-account role has no kms:DescribeKey/kms:CreateGrant permissions, or the KMS key policy does not allow the role. |
| Cluster is stuck in Pending controller connect | The nodes cannot reach Nirmata over outbound HTTPS. Check the NAT gateway, route tables, and security group egress rules. |
See Also: